![]()
In short: The IoC Lookup downloads IoCs (“Indicator of Compromise”, i.e., malicious domains, IP-addresses, or URLs) from different blocklists and unites them into three csv files (one for each type). The information of this files is served via a REST-API and can be used by Graylog through an HTTP-JSONPath Adapter to serve a Lookup Table.
A common usage scenario is to tag and enrich all kind of logs (i.e., Active Directory, VPN, DNS, Email, etc.) containing malicious IPs, domains or URLs with detailed information about the IoC for further investigation.
It requires little work to set up, the most extensive being configuring the Flask Server for the API and setting up the JSON file with the blocklists to download.
Furthermore, it is easily expandable for new blocklists or Use Cases.
IOC-Lookup 1.0 für Graylog
This plugin reads CSV-Lists with IOCs via HTTP-JSON Path-Adapter.
Cost: 250,- Euro excl. Vat
How does it work?
IoC Lookup consists of two small programs, a Graylog Lookup Table, and some Graylog Pipelines. The first being the initial program to download the blocklist and provide the csv files with IoCs (“ioc-lists.py”) and the second one being the Flask Server (“ioc-server.py”) providing the REST-API for further lookup.
The main program (“ioc-lists.py”) downloads all given blocklists in “downloads.json” and saves them temporally for further usage. After completing all downloads, it reads every file and separates the containing IoCs into three categories, IP, domain, URL. Furthermore, it tries to enrich the found IoCs with additional data like the date of the first appearance. In the next step the sorted IoCs and its sources are saved in three different csv files, one for each type of IoC, i.e. one file for IPs, one for domains and one for URLs.
Additionally, the IoC data can be queried through a lightweight Flask REST-API (“ioc-server.py”). The API serves an endpoint (“/lookup”) which expects a get-request with the lookup value (IP, domain, URL) and an authorization token. If the given lookup value is known as an IoC the source of the IoC blocklist it is found in is returned, otherwise the request returns false. Furthermore, the API serves the endpoint (“/reload”) which expects a post-request and authorization token and provides a way to update the API with new IoC data from the files.
The API endpoint is used with an Graylog HTTP JSONPath Data Adapter to serve a Lookup Table. This Lookup Table is used in different Pipelines to check different logs containing IPs, domains and URLs for being IoCs and if yes, to enrich the log with additional information.
Installation
Initial Installation of IoC Lookup
After you receive your copy of IoC Lookup copy it to a system running any Linux operating system featuring systemd. Now you need to install the Python dependencies. You can do this by executing the following command inside the IoC Lookup folder: “pip install -r requirements.txt”. If you have a system with booth Python 2 and Python 2 installed, you need to call “pip3” instead of “pip”. Afterwards you need to create two folders inside your program directory: “downloads” and “lists”.
For the Flask Server to work you need to install “gunicorn”, this can be done with the console command: “sudo apt install gunicorn3”. If you wish you can use “apt-get” instead of “apt”. Additionally, you can install “gunicorn” using pip: “pip install gunicorn”.
Configuration of ioc-lists.py
Configuration of the main program (“ioc-lists.py”) is done via the “ioc-lists.conf” file. This configuration file contains all information needed for the program to run. You need do adjust lines 3 and 6 of the file to contain the absolute path to the two directories.
Initial configuration of blocklists to download
IoC Lookup is delivered with a preselection of different blocklists to use. If you want to include other blocklists see “How to customize”.
Configuration of ioc-server.py
Configuration of the Flask server relies on “ioc-lists.conf” and “ioc-server.service”. Furthermore, you need to create a file “token.txt” in your program directory. The configuration file “ioc-lists.conf” was already configured in a previous step, so there is no action required.
However “ioc-server.service” needs additional configuration. In line 7 you need to provide the absolute path to “ioc-lists.conf” and in line 8 the absolute path to the newly created file “token.txt”. In lines 9 and 10 you need to set the user and group which should run the server. Additionally, you need to adjust line 15 to match the absolute path of the working directory. By default, the server runs on port 5000, if you want to change the port adjust line 16. Depending on the installation directory of “gunicorn” you also need to adjust its directory in line 16.
Finally, you need to edit “token.txt”. This file contains the authorization token required for the API endpoints. Simply create a new and secure token and paste it into this file.
Daemon for Flask server
- Place the file “ioc-server.service” in the directory “/etc/systemd/system”
- Start the server with “systemctl start ioc-server”
- Enable automatic start on boot: “systemctl enable ioc-server”
Cron Job
The creation of a cron job is recommended to regularly execute IoC Lookup and update its lists and the server. The execution interval depends on your conditions.
The crontab for IoC lookup should follow the following scheme:
python3 <absolute-path>/ioc-lists.py –config <absolute-path>/ioc-lists.conf && curl -XPOST -s –show-error “http://<ip:port>/reload?token=<token>” > /dev/null
For example:

(click to enlarge)
With this command the IoC Lookup gets updated every hour and automatically reloads the Flask server.
Graylog Lookup Table creation
To utilize the IoC Lookup in Graylog you need to create a Lookup Table. A Lookup Table in Graylog consists of three parts: the Lookup Table, a Data Adapter, and a Cache.
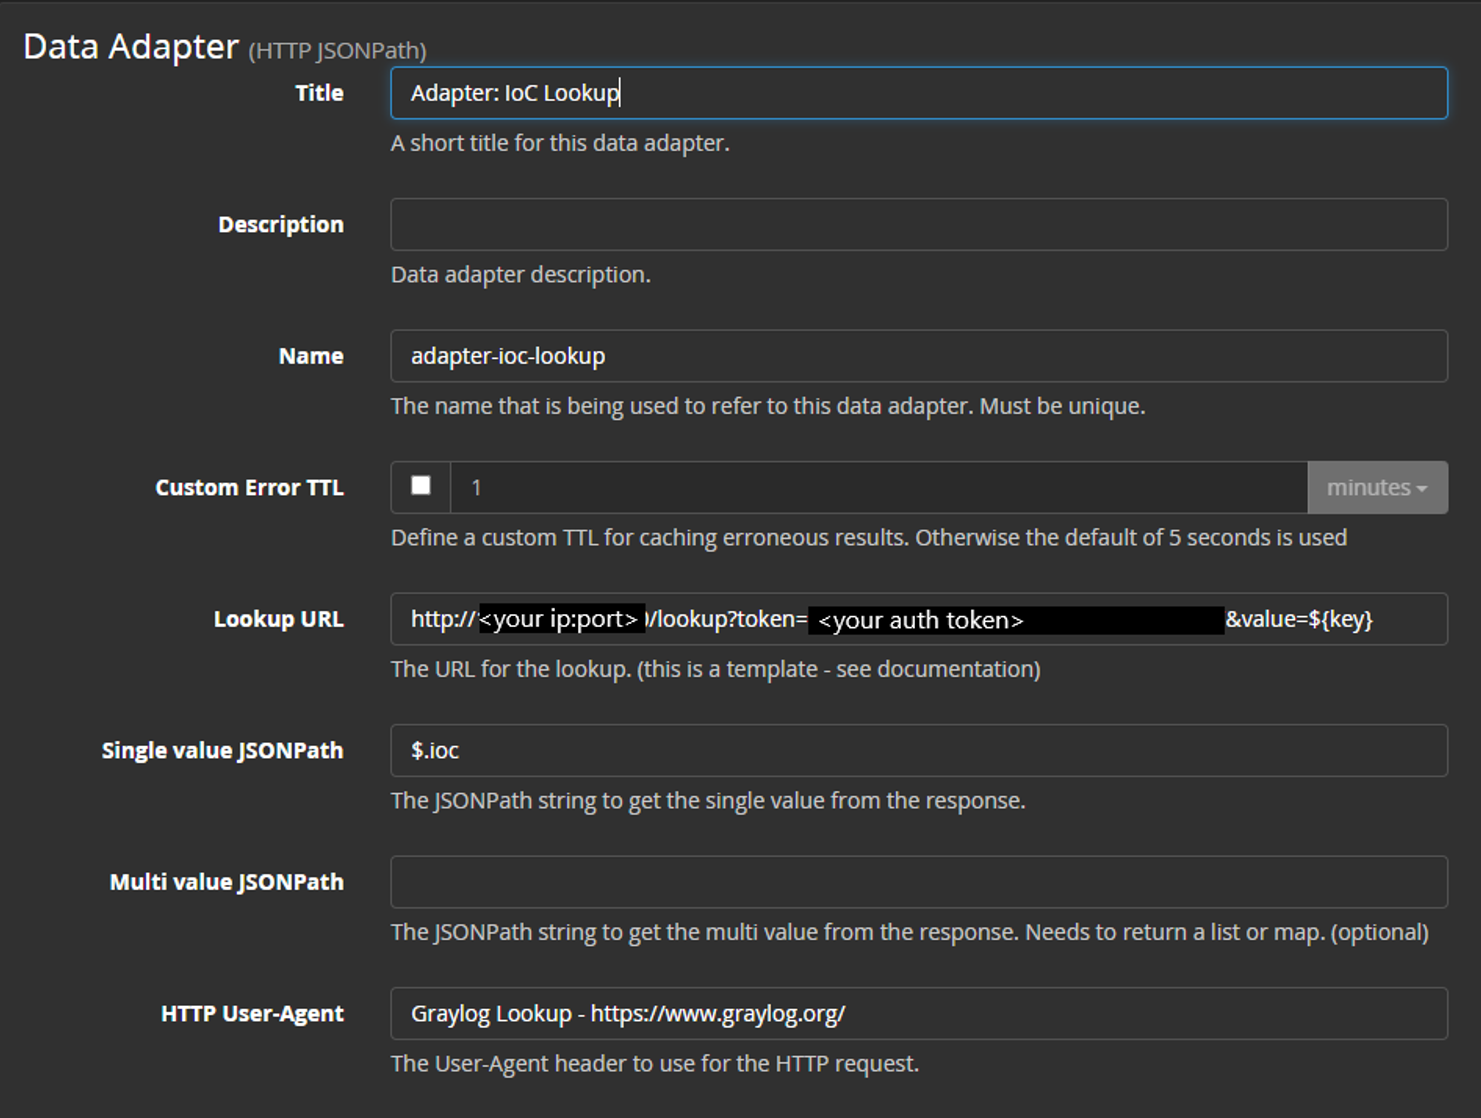
First you will create the Data Adapter. To do so navigate to the Lookup Table page in Graylog via the menu System->Lookup Tables and then select Data Adapters from the top right menu. After that you click on Create data adapter and select HTTP JSONPath as the Data Adapter. Fill out the form as follows:
- Title: Enter “Adapter: IoC Lookup” as the name
- Lookup Url: http://<ip:port>/lookup?token=<token>&value=${key} Replace <ip:port> and <token> with your corresponding values.
- Single value JSONPath: $.ioc
- HTTP User-Agent: Graylog Lookup – https://www.graylog.org/
It should look something like this:
(click to enlarge)
You can save the Data Adapter now and proceed with the creation of the Cache. Select Cache from the top right menu and Create Cache. From the dropdown select “Node-local, in-memory cache”.
Configure the adapter as follows:
- Title: “Cache: IoC Cache”
- Maximum Entries: 1000000
- Expire after access: tick the checkbox and select 45 seconds
It should look like this:

(click to enlarge)
Finally, you configure the Lookup Table itself. Select Lookup Tables from the top right menu and then Create lookup table. Give the Lookup Table a name like “ioc-lookup” and select the previous created Data Adapter and Cache. Save the Lookup Table and it’s ready to use.
Graylog Pipeline creation
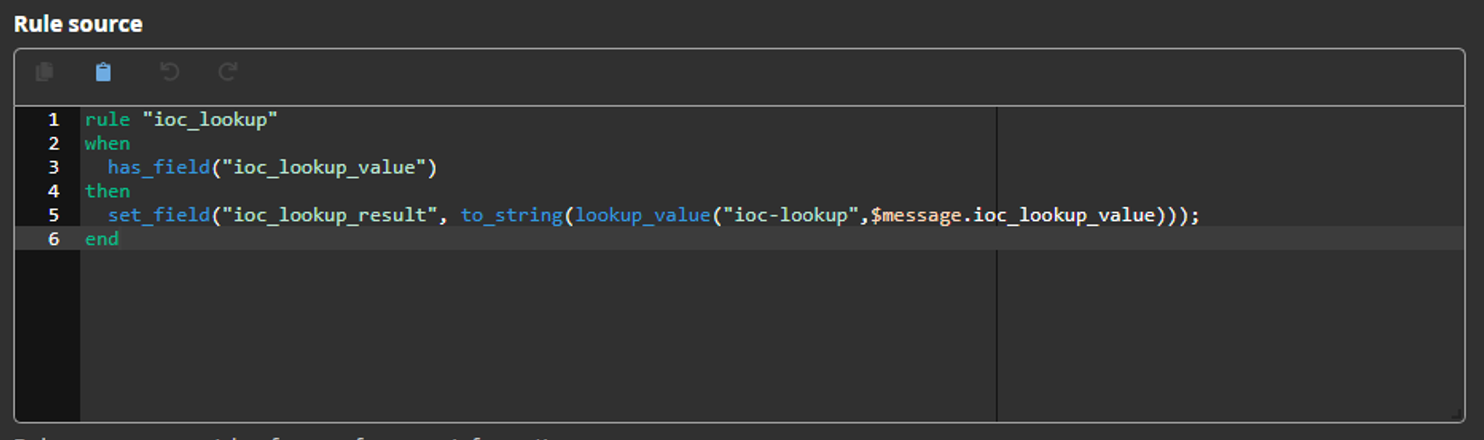
To use the created Lookup Table, you need to use Graylog Pipelines. For IoC Lookup at least one Pipeline is required. To create the rule, navigate to Pipelines via the menu System->Pipelines and create a new rule. Give the rule a description and enter following code in the section “Rule source”:
rule “ioc_lookup”
when
has_field(“ioc_lookup_value”)
then
set_field(“ioc_lookup_result”,
to_string(lookup_value(“ioc-lookup”,
$message.ioc_lookup_value)));
end
It should look like this:
(click to enlarge)
The rule requires the field “ioc_lookup_value” to exist and contain the value (IP, domain or URL) to look up. If this field exists it makes a call to the Lookup Table and writes the result in a newly created field named “ioc_lookup_result”. The created rule needs to be attached to a Pipeline. The Pipeline to which it gets attached depends on your needs. It can be used with a variety of logs, they only need to contain a IP, domain or URL.
How the field “ioc_lookup_value” is created and populated depends on your Graylog setup. For example, it can be done with other Pipelines and isn’t part of this guide.
How to customize
IoC Lookup is highly customizable regarding the used blocklists. It ships with a preselection of blocklists and parsers for them.
Adding a new blocklist
If you need or want to add other blocklists to monitor more Use Cases you can add the new blocklist to “downloads.json” according to the following format:
{
“url”: <Full URL to the blocklist>,
“source”: <Source of the blocklist>,
“type”: <Type of file (“text/plain” or “text/csv”)>,
“content”: <Content of file (ip/domain/url)>,
“parser”: <Parser to be used>
}
You can look at the predefined blocklists for further guidance and for information about the existing parsers.
Adding a new parser
For parsing the blocklists an abstract factory pattern (see https://en.wikipedia.org/wiki/Abstract_factory_pattern for more information) is used. All code regarding the parsers can be found in the folder “ioc”. The folder “ioc” contains a folder “parsers” which contains subfolders for the supported file types (text, csv, json). The structure of relevant folders/files is as following:
- ioc/parsers
- _init_.py
- parser_factory.py
- csv
- _init_.py
- factory.py
- parser.py
- json
- _init_.py
- factory.py
- parser.py
- text
- _init_.py
- factory.py
- parser.py
Writing a new parser for an existing file type
If you need a new parser for an existing file type, you need to edit the files “factory.py” and “parser.py” inside the corresponding subfolder.
1. First step is to write a create a new class inside the “parser.py” file.
a. The class needs to implement the static method “parse(text_file, source)” which returns the IoC data.
2. Afterwards you need to edit the file “factory.py” to register the new class.
a. Add a new “elif”-case for the parser and call the “parse” function of the parser.
For further guidance look at the other parsers’ implementations and how they are registered in both files.
Writing a parser for a new file type
If you need to parse a new file type you need to add a new subfolder for that type and create three files “__init__.py”, “factory.py” and “parser.py” inside this subfolder.
-
- First step is to create the needed parser inside “parser.py” (see description in Writing a new parser for an existing file type).
- After that you need to import the parser in the file “factory.py”, this can be done with “from .parser import *”. This imports all parsers from their file.
- Now you need to create the factory class for that file type in “factory.py” and define the static method “create_<file-type>_parser(file)”. Substitute <file-type> with your corresponding file type. This function is used to call the parsers of the file type.
- Export the newly created factory in the “__init__.py” file. This can be done with “from .factory import <factory-name>”.
- Import the new factory in “parser_factory.py”. Look at how the other factories are imported for guidance.
- Register the new factory and file type in the method “create_parser(file)” of the file “parser_factory.py”.
For more guidance and information look at how the other factories and parsers are implemented and repeat the same process.
FAQ
Question: Is IoC-Lookup compatible with Graylog Enterprise?
Answer: Yes.
Question: On which OS can IoC-Lookup run?
Answer: IoC Lookup has been tested on Ubuntu Linux. As the Flask server is intended to run as a systemd daemon it requires a Linux OS. Usage on other operating systems is not supported.
Question: What are the prerequisites for using IoC Lookup?
Answer: A stable internet connection, Python in version 3.6 or never and the libraries “requests”, “validators” and “Flask”. You also need logs containing IP-addresses, domains, or URLs as well. The Flask server relies on “gunicorn”, this needs to be installed as well.
Question: Is Python 2 supported as well?
Answer: No. As Python 2 reached its EOL in January 2020 it’s not supported.
Question: Which Graylog version is required?
Answer: IoC Lookup works with all Graylog versions if they provide an HTTP JSONPath Data Adaper.
Question: What file types can the blocklists be?
Answer: IoC Lookup supports by default text-files (.txt), csv-files (.csv) and json-files (.json). If you need to support other files you can extend the program with your own parsers for that file type.
Question: Are local files also supported?
Answer: Yes! The blocklist doesn’t have to be an online resource. Local paths are also supported as the file URL.
Question: Which data is attached to each message flagged by IoC Lookup?
Answer: The following additional fields are contained in the messages:
- ioc_lookup_field: shows in which log-field the IoC was found, for example server_ip
- ioc_lookup_result: shows the result from the API request i.e., which blocklist contains the malicious Ip, domain, URL
- ioc_lookup_value: contains the found IoC
- ioc_lookup_value_sanitized: contains a sanitized version of the found IoC
Question: Can I customize the IoC Lookup?
Answer: Yes, you can customize the used blocklists. You can also freely customize for which logs you use the IoC Lookup. For more information see “How to customize”.
Question: Can IoC Lookup be used in a Graylog cluster?
Answer: IoC Lookup can work with a single Graylog server or a whole Graylog cluster. As IoC Lookup runs on a different system than Graylog and Graylog uses a Data Adapter to fetch the information this works with any number of Graylog nodes.
Question: Which endpoints does the API provide?
Answer: The following endpoints are provided by the API:
- /lookup [GET]: To fetch the result of a IoC lookup
- Requires token and value
- For example: http://<ip:port>/lookup?token=<auth token>&value=<lookup value>
- /reload [POST]: To reload the server to serve new information
- Requires token
- For example: http://<ip:port>/reload?token=<auth token>
Question: How is the software licensed?
The software is bought as it is and can be used for one cluster. For newer versions you will need to buy the new Version.